Monday, December 23, 2013

Practically Completed Vogue 2401

Except from hemming the bottom, Vogue 2401 is finally done. Thank goodness.

General thoughts:

Overall, this wasn't a terribly hard pattern (except, of course, for those darn wrap ties). Granted, the fabric I chose to work with wasn't the easiest to sew, but overall I think the silkiness of it looks great. The collar is a real strong point of this pattern, very sharp looking and gives the dress a sophisticated 1950s, Dior feel. The skirt isn't quite as full as I thought it would be; I'm not sure if it will be possible to wear a petticoat underneath.The wrap ties that are connected to the front sides of the skirt remind me of the Butterick walk-away dress (B 4790). The waist came out a bit tight, I definitely need help getting in and out of this dress. Luckily there was enough room in the sleeves with this pattern, something I've had trouble with in patterns lately.

Would I make it again? Yes, I think I would. Maybe next time with taffeta, or a more casual cotton.

Pictures? Of course!

I swear, it looks better on!

See what I mean? Totally looks like the Butterick walk-away dress. Although, I must say, an overall more snazzy design. 

yeah, the flash makes things ultra-bright

Anyways, Happy Holidays, and Happy Sewing!


Saturday, December 14, 2013

Bah, Humbug: Vogue 2401

So I feel like I've been to hell and back with this bodice. As usual, there aren't enough pictures with the pattern directions, especially around the wrap ties/lower bodice area. I've googled this pattern to see if anyone that had made it put pictures on their blog with the wrap ties untied. Not much out there. What exactly has been the most difficult part? Attaching the wrap ties to the bodice. Doesn't sound hard, but its been tricky finding where exactly to attach them so no seams show and so the arm holes are free. I think I finally have it down though. Eureka!

Here's a picture:
wrap tie attached to the side, underneath the front side piece, there are three layers of fabric on this seam

This took a long time! So glad its over. Unfortunately the waist is a bit small, but doable, maybe insert a zipper later.

Here's a picture with the wrap ties tied:
at least the wrap ties are nice and long, so I can make a substantial knot

If you decide to make this pattern, be patient with this portion. It may also help to use a thicker, sturdier fabric. Although I like my choice, it is thin, and moves around a lot! 

Oh, and did I mention I got the collar attached? Well, obviously you can see by the pictures. It was actually quite painless. The sew-in interfacing was much thicker than what I'm used to sewing. I used a stiff, thick one. I recommend using a fairly stiff one, since the collar is such a central element of this garment. Pressing numerous times is a must! You have to fiddle with it a bit to get it to set right, but it eventually does. The collar has a seam down the center back (the collar comes in two pieces). The sew-in interfacing helps reinforce this seam.

The seams are fraying like mad with this satin fabric I'm using, I think I'll have to track down my extra bottle of fray-check (love this stuff). Next I need to attach the skirt which comes in several pieces. Getting there!

Happy Sewing

Monday, December 9, 2013

Side Pieces, Wrap Ties, Fa La La La La

Man oh man. Holidays. Know what I'm saying? But I have made some progress on Vogue 2401, despite shopping, gift wrapping, decorating, and the oh-so-cold temperatures here. I'm to the wrap ties portion of the dress. They've been confusing. They are attached to the bodice back, but not the sleeves, creating even more seams near the armpits. I've been turning this thing inside, and outside, and back again, trying to attach these wrap ties. Oh, and I've learned how to use Power Point to create pictures with arrows and hopefully some more helpful descriptions of what I'm talking about. 

Bodice Back:

Not hard at all, pretty self-explanatory.

Bodice Side Front:

You have to stretch and rotate this piece so that it attaches straight. Hey, whatever gives the garment some extra inches around the waistline!

The top seam is turned inside, while the bottom is left with the seam showing. Like I mentioned earlier, this portion has been a holdup. I think I'm past it, but we'll see. As with every project, you really never know until its finished and you've tried it on.

Nitty Gritty insides:

The nasty insides, where rugged seams and fraying edges meet. You can see where the wrap tie is turned inside with the second arrow. Only part of the wrap is turned, the exposed lining shows where it isn't. 

Final Shot:

This is what the top looks like so far. Aye aye aye, always the roughest part of garments for me.

What's up next? Collar. Groan. I'm using sew-in interfacing which I've never used before. And I will be attaching shoulder pads, which I've never done before. Should be interesting. 

Happy Sewing!

Tuesday, December 3, 2013

A Good Ol' 1950s Holiday Dress, Progress on Vogue 2401

Aye aye aye. Haven't posted in a week. Thanksgiving, copious amounts of food and cooking, and a cranky puppy. Those are my excuses. Good ones? I don't know. But I have made some good progress on Vogue 2401, henceforth known as my holiday dress.

So, I finished lining all the bodies pieces. This took a while, but I think it will be worth it. The first order of business (i.e. the directions actually in the pattern) was to sew the darts in the back bodice piece. There are a couple in the back portion and in each arm:

the back
the arms

Nothing I haven't done before. I really like the idea of darts on the arms pieces. Why don't many modern blouses have darts in the arms? It adds structure, and look quite nice, giving the garment a tailored appearance. (Looks like I answered my question there, modern garments hardly ever look tailored since that's the style? now) 

There's also a couple little darts near the neck edge:

The back bodice is cut in two pieces, so I had to sew those together, hence the seam running down the back.
Next was the front bodice pieces. I ran into a bit of a snag with these. I forgot to turn the pattern piece over when cutting the alternate side. Result? Two left sides. No good. Rookie mistake. After I figured out what I had done there were a few little darts in each piece. Next was the front bodice side piece to attach to these pieces. Making sense? No? That's okay, here's a picture:
the piece attached at the side is the side piece
Not too bad. You do have to sort of twist the piece to get it to attach straight. The side front piece is a little rounded. FYI-if you make this dress DO clip to the dot of the front bodice. The top of the side piece must slid under the bodice at the armpit. If you don't clip, it won't. 

The last thing I've done on this dress is the sewing (pre-attachment) on the other bodice side piece (piece # 4). Its kinda weird. You end up making this piece a triangle on one side with the wrong side facing out:
the seam is sewed at the bottom
The last thing:
still the same piece
Clipping! So very important on this garment. This is the top of the same piece.The folded down triangle part must be clipped at the top. I think I see where they're going with this, not sure yet though.

Whew, that's all for today!


Tuesday, November 26, 2013

From Hoop Skirt to Bustle

Soon is a relative term. But hey, under a week isn't bad, right? Before my promised post about the transition from the hoop skirt of the 1860s to the bustle of the 1880s, I must report on my progress on Vogue 2401. So far I've cut out all the pieces, including interfacing (a sew-in one this time), and lined the bodice pieces. Although the pattern doesn't call for the bodice to be lined, I really think it should be lined if you're using a silky, somewhat thin, material like I am. This has taken quite some time, more than I anticipated. But this part at least is done. Now I can actually start constructing the dress!

On to business...

For a while now I've been interested in how women's fashion got from the humongous hoop skirts of the 1850s-60s to the bustles of the 70s and 80s. How, I ask myself did we get from this:

(Englishwoman's Domestic Magazine, 1862)

To this:
1875- Scottish plaids gained favor and fashionability in the midst of the 1870's- this one also featured frilled skirting sweeping the floor, a bowed bustle and a modicum of attitude.
(Philadelphia Museum of Art 1875)

Well I found my answer thumbing through Janet's Arnold's Patterns of Fashion Vol. 2.

The answer? The gored skirt.

Gored skirts, its turns out are very versatile. They could be used to create the hoop dresses of the civil war era, (provided a crinoline and/or a hoop was worn) or a nice transition dress this like one:
Dress
(V&A, 1869-1870)

The difference, aside from the undergarments, would be the shape of the gored panels. A full-blown 1860s dress would have gores that looked more similar in length and overall shape. The transition dress of the late 60s/ early 70s would have had longer gored panels for the back train of the skirt. The front panels would be shorter. This, at least, is what I have ascertained from Ms. Arnold's wonderful sketches in PoF. This it seems, is a trend that carried over into the bustle period. So there ya go, mystery solved!

Now, back to the 1950s!

Thursday, November 21, 2013

Do I need a new dress? No, but so what!

So I finished the 40s blouse last week. And I actually wore it! Its pretty comfy, nice and loose. Not exactly the retro look I had expected, but its a nice addition to my wardrobe. So with the holidays coming up I thought why not make a dress? A nice, satiny, shiny, look-like-a-million-bucks dress. I pored over my patterns for several days. I don't know why it takes me so long to decide, it just does. There were several in my stash I thought about making, some really snazzy ones too. And then I came to my vintage vogue patterns. Some of these I've had for about 4 years now, intending on making them, but never actually, well, making them.

I've been a little intimidated by them. They're beautiful, yes, but complicated looking. But I bucked up, and chose one of the "intermediate" level ones. (We'll see if it is really intermediate) Its Vogue 2401, a 1952 design, with quite the collar:

The red one has longer sleeves. I'm going with that one, mostly because I forgot to shorten the sleeve piece before I cut the fabric. What fabric am I using you ask? Its a magenta, satin. Probably polyester, yes I know, but i got it very cheap. A good thing too, because this dress calls for almost 6 yards. Yesh! Typical vintage style, nothing compared to historical dresses though!

Ironing such a big piece takes a while, let me tell you
it still ended up wrinkled when it came to cutting

Currently the pattern pieces and dress pieces are residing on the living floor in a heap. Soon it will take shape! Holidays here I come!

On the horizon? Well, other than making this dress? I've been thinking about posting on reconstruction era dresses (late 1860s). I'm quite interested in the transition from the huge hoop skirts of the civil war era, to the "natural" form of the 1870s and the bustle skirts of the 1880s. The reconstruction era (to me anyways) seems like a forgotten era in historical fashion, much like the 1830s. 

Look for this post soon!

Saturday, November 16, 2013

Finished- Simplicity 40s Blouse

Yeah! Finished another blouse. Simplicity 1692 was pretty easy, nothing unexpected. I'm pretty pleased with the fit too! Its a bit loose, so comfortable and contemporary, even though it is a 40s design. The sleeves are attached to the front and back pieces, so I didn't even have to separately attach sleeves, which is awesome. The only thing about the pattern that I felt wasn't necessary was the zipper. If you make the blouse loose enough like I did (I followed the sizing on the pattern, if you want a tighter fit maybe size down one size), or if your fabric has any stretch to it, the zipper is not needed. The blouse slips over my head, even though I didn't add the buttons.

I did add the zipper, to be safe:
seriously, probably the first time I didn't have to redo, or do any seam ripping on the zipper

See all the fraying? The silky fabric I used definitely needed this:
Put on seams, this great stuff stops the fraying. It does smell, and it will get on your fingers and dry like glue. But for a fabric like this one, totally crucial.

Here's a picture of a seam with the seam glue:
The dark spot along the edge is where the fray glue is applied. Apply it on the wrong side!

After this was just a bunch of hemming, blah.

Here's the finished product:

Yeah, the color is totally different in each picture. The actual color is between these two.
Happy Sewing!

Wednesday, November 13, 2013

Progress on Simplicity 1692

Whew, am I pooped. Our little puppy has been quite a handful lately. On top of that, I got a flu shot last Friday and I think it had some kind of effect. I've been sleeping a lot lately. But....I have made progress on the 40s blouse! I decided to go with view D minus the buttons on the shoulders. At first I thought the buttons were decorative, but it turns out they are actually functional. Nevertheless, I decided to go without them; I'm not a big fan of things dangling from or around my shoulders. As a result, the neck hole is rather small, but I can still get my head through it without a lot of grief so I'm keeping it that way.

A few nights ago I cut out all the pieces:
A good chunk of fabric left over, but not enough for any of my patterns. Save it for trim? (btw, I think my fabric my actually be 100% rayon, not sure though) I also had to cut out some interfacing for the collar area. I used a lightweight fusible interfacing like the pattern says to. You probably wouldn't want anything to heavy if you're using silky, light fabric like I am.

There are two tucks on the front that give the front some structure.

Next I sewed the shoulder seams of the silky fabric together, giving the blouse a real poncho look...yuck! (ponchos are weird)

Next came the back and front facing(s) for the collar area.
Step one: fuse interfacing to fabric pieces, making sure the iron is stinking hot:

Step two: when dry, (it takes a while) sew shoulder seams of these fused pieces (no pics, it was late and I was tired)
Step three: pin these pieces to the neck edge of blouse and hope it turns out neat enough (again, no pics of this part)

Finally, press the back and front facing pieces inward so they don't pop out:

So the blouse still has a distinct poncho look, but its coming together. Next comes side seams, zipper, and hemming. So far this blouse has been pretty easy. If you like 40s clothing and can sew, I highly encourage you to try this pattern. Its easy and doesn't use a lot of fabric, a good pattern for using up any stash fabric! 

Well that's all I have for today, 
Happy Sewing!

Friday, November 8, 2013

Another Possible Blouse on the Horizon

So I've been getting the itch. The itch to sew something.After looking at all my patterns and my stock of fabric, I think I've decided to make another blouse. I know, not as glamorous as a big, fancy circle skirt dress, but I don't exactly wear those everyday. I want to have some more realistic vintage pieces in my wardrobe, things I might actually wear on a daily basis. So I don't have a lot of blouse patterns, but there is one in my collection I've been wanting to make for a while: Simplicity 1692
 
Isn't that cute? And although it is distinctly retro, I feel like this blouse looks contemporary too. The modeled version looks especially contemporary. Which version am I thinking of? Well, possibly C or D. But if I make version D I am not adding the ric rack. Not a big fan. Not sure if I would add the buttons at the shoulders on version C either. Sort of a cute idea, but odd.

I have some silky dark blue fabric in my stash. I'm not sure what the fiber content is, I'm guessing at best it is part rayon. Oh well, it was affordable. And the drape is nice, just enough weight to make it practical for everyday wear.

Who knows I might change my mind. I just discovered that Simplicity has another blouse pattern for the 40s that I don't have: #1590

I'm loving the tied bow are the back of B. Not sure if that would be a good idea for me since I have, how-do-you-say some 'junk in the trunk!' But still quite pretty.

That's all I have for today!

images courtesy of sewing.patternreview.com

Tuesday, November 5, 2013

Romantic Era corsets and the New (but really old) Silhouette

To follow up with my last post on regency stays and silhouettes, I want talk a little about the subsequent era of fashion: the romantic era. Roughly from 1820-1840, the romantic era followed the regency era. This era in fashion saw a lowered waistline, going from the regency era where the waistline was just below the bust, to a few inches above the natural waistline. What, you may ask was responsible for this?

The return of the honest-to-goodness corset. Dun dun dun....

Unlike the short stays of the regency era that were relatively comfortable and bra-esq, the corsets of the romantic era returned to the squeezing function of corsets of the 18th century. Although romantic era corsets were not as heavily boned, the waist cinching idea was still the same.

Regard this example from the Kyoto Museum (1820):

 1820 American corset

The busk is stiff, probably wood or ivory, and the corset receives its shape from cording, or light boning. There is also an attempt at hip gusseting.

Here another example from the Los Angeles County Museum of Art (1830s):
File:Sleeve plumpers.jpg
Like the other example, the hips flare out, while the waist is cinched above the natural waistline. Unlike the previous example, this corset is laced. Another thing to note about romantic era corsets: the boobs are separated. While regency stays attempted to push the bust upwards by compressing the and pushing  the bust together, these corsets separated the boobies!

This image also demonstrates the return to petticoats during the romantic era. Unlike the regency era where petticoats were largely abandoned in favor of a more natural appearing figure, the romantic era saw a return to puffy skirts, which often meant not just one, but at least two layers of petticoats! These were also corded, and helped make the waist appear smaller. Can you imagine how much all this must have weighed? Women must have gotten their exercise just walking around in this stuff!

Want to see some dresses that demonstrate the results of romantic underwear? Yeah I though so, here ya go:

Dress
The Met (1825-1830)

Dress
The Met (1832-1835)

Walking ensemble
The Met (1835)

Images and research courtesy of:
The Met
http://www.maggiemayfashions.com/romantic.html
http://www.cfa.ilstu.edu/lmlowel/the334/romantic/romanticreview.htm


Saturday, November 2, 2013

Regency Stays, a Change in Silhouette

Boy am I pooped! We got a new puppy! And, perhaps needless-to-say he's a handful. Oh well, he's sweet and very very cute! Here's a gratuitous puppy picture:

Now, back to business. Since I've completed my latest sewing project, I'm between projects right now (not to mention tired:). I thought I'd talk a little bit about a topic of interest to me and others interested in regency fashion: regency stays.

Now the regency stay is often referred to as the "short corset." Unlike the corsets of the 18th century and the Victorian Era, the regency corset drew the waistline up just below the bust. This pushed the bust up, (often creating that heaving bosom thing) and let the waist be unconstrained. The short stays are closer to the modern bra than corsets from the 18th century and Victoria era. 

Here's a pictorial example:


From what I've read, the front of the stays were reinforced with a wooden busk (some say whalebone, some don't). The rest of the corset was corded. They were more of support garments rather than the figure altering styles of the previous and subsequent eras. As with these other eras, regency stays were worn over a chemise.Over this was the dress! Isn't that scandalous?! I can only imagine Victorian women saying "What no petticoats, no corset covers, no drawers!?!?"

As you can see from the picture, the top was drawstringed. I can only imagine this helped push the bust up even farther. Something that interests me on the shorter version is the side. Quite stretchy! I know I've read about this sewing technique, but can't remember its exact name. Anyone know?

I've worn a steel-boned corset before, and all I can say is these look soooo much more comfortable!

Here's an illustration from 1811 depicting regency stays:


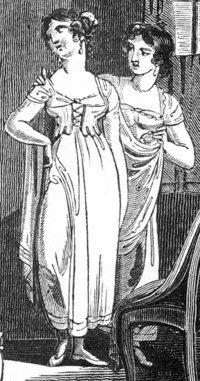
a bit of lacing, but nothing too serious

The result of short stays on the silhouette? A much more natural, free shape. The shape took its inspiration from classical Greek statuary- free-flowing. (Well, all except the boobs, very high)


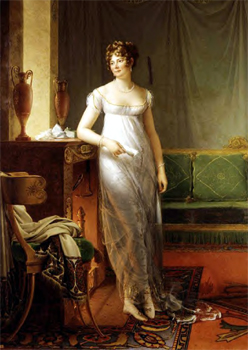
From the bust down, the figure is free


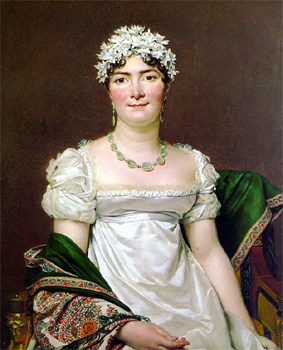
another high bust, funny even the head wear/hairstyles look Grecian

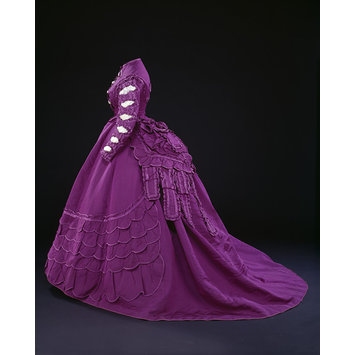
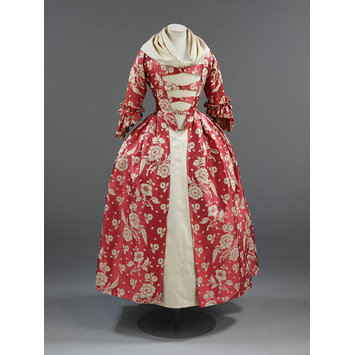
Contrast these silhouettes with one from 1760-1769:
Gown

And one from later in 1858-1860:
Dress
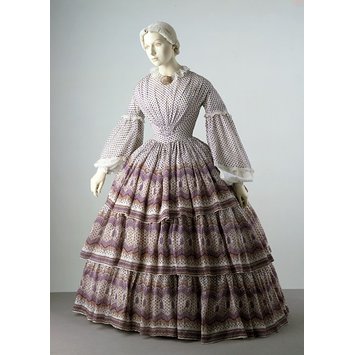
Both good examples of constraining corsets!

Well that's all I have for now!

images and research courtesy of:
janeausten.co.uk
wemakehistory.com
Victorian and Albert Museum

Thursday, October 31, 2013

Finito!!! - Burda 7255

Wheww! I finished the blouse. Since my last post I had to attach the bottom band, sew buttonholes, and the buttons. The buttonholes went surprisingly well this time. The blouse came out a tad small, especially in the arms, but I think it will still look good with a pencil skirt, or skinny pants.

Here it is:

I still need a bottom button, will have to make a Joanns trip. 

pining the bottom (waist?) band

attached! The pattern instructions said to sew this part by hand, but I couldn't really see the advantage in sewing by hand since the top is turned in and sewn. 

Marking the buttonholes. The pattern didn't specify how far apart to space them. I measured the length from top to bottom and divided by 5 (buttons). I got about 4 inches apart. Then I had to sew the buttons by hand because yesterday when I tried the button stitch on my sewing machine I broke the needle :( Thank goodness for replacement needles!

The right side of bottom band is slightly lower than the left side. Oh well, if I wear it tucked in no one will know!

Yay, all finished! I'm thinking of doing some research (historical clothing) posts next since I'm between projects now. It takes me so long to decide what to make next aye aye aye!


Monday, October 28, 2013

Sleeves

Before I detail the sleeve attachment on Burda 7255, I have to gush about Janet Arnold's Patterns of Fashion v. 2. I ordered it when we ordered a crate for our new puppy. It got here today! Its sooooo cool! I want to make everything in it, but will definitely have to build my sewing skills before I attempt any of the  pre 1920s patterns. For anyone who doesn't know, this book is a book of scaled dress patterns 1860-1940 (only British/European). They are very detailed and heavily researched. Just by glancing through the patterns, it looks like Ms. Arnold took a lot of the designs from specimens at the Victoria and Albert Museum. My only complaint is that the patterns from the 20s/30s are, well, odd. They don't seem to represent what you'd call the quintessential looks of these decades. Arnold explains this by saying that during these periods (and the WWI era) a lot of dresses were taken apart and updated for the new styles to save money. Makes sense, but still kinda stinks if you like the 20s/30s. Oh well, there are plenty of other resources for these decades. The patterns from 1860-1920 are FANTASTIC. Seriously. Arnold even includes the color and content of the fabrics used, as well as the trim(s). And she includes recommendations for undergarments, although no patterns for these :( Nonetheless, its cool, really cool, if you're into historical clothing.

In other news, I attached the sleeves on Burda 7255 today! Yeah! No too bad really, pretty basic.

marks for ease stitching

marks for sleeve dart

ease stitching

sleeve dart


sewn sleeve seam

sleeve hem, I did about 3/4inch

now its starting to look like a blouse

Next I have to sew the band around the bottom hemline. I really like the idea of the giving the bottom of the blouse some structure. After that are the buttonholes. Poo. I don't like buttonholes. 

Baring any unforeseen complications, I can definitely see myself using this pattern again. Looking at the pictures,  I think this pattern would even be good for a short jacket.

Anywhos, Happy Sewing!