Thursday, October 31, 2013

Finito!!! - Burda 7255

Wheww! I finished the blouse. Since my last post I had to attach the bottom band, sew buttonholes, and the buttons. The buttonholes went surprisingly well this time. The blouse came out a tad small, especially in the arms, but I think it will still look good with a pencil skirt, or skinny pants.

Here it is:

I still need a bottom button, will have to make a Joanns trip. 

pining the bottom (waist?) band

attached! The pattern instructions said to sew this part by hand, but I couldn't really see the advantage in sewing by hand since the top is turned in and sewn. 

Marking the buttonholes. The pattern didn't specify how far apart to space them. I measured the length from top to bottom and divided by 5 (buttons). I got about 4 inches apart. Then I had to sew the buttons by hand because yesterday when I tried the button stitch on my sewing machine I broke the needle :( Thank goodness for replacement needles!

The right side of bottom band is slightly lower than the left side. Oh well, if I wear it tucked in no one will know!

Yay, all finished! I'm thinking of doing some research (historical clothing) posts next since I'm between projects now. It takes me so long to decide what to make next aye aye aye!


Monday, October 28, 2013

Sleeves

Before I detail the sleeve attachment on Burda 7255, I have to gush about Janet Arnold's Patterns of Fashion v. 2. I ordered it when we ordered a crate for our new puppy. It got here today! Its sooooo cool! I want to make everything in it, but will definitely have to build my sewing skills before I attempt any of the  pre 1920s patterns. For anyone who doesn't know, this book is a book of scaled dress patterns 1860-1940 (only British/European). They are very detailed and heavily researched. Just by glancing through the patterns, it looks like Ms. Arnold took a lot of the designs from specimens at the Victoria and Albert Museum. My only complaint is that the patterns from the 20s/30s are, well, odd. They don't seem to represent what you'd call the quintessential looks of these decades. Arnold explains this by saying that during these periods (and the WWI era) a lot of dresses were taken apart and updated for the new styles to save money. Makes sense, but still kinda stinks if you like the 20s/30s. Oh well, there are plenty of other resources for these decades. The patterns from 1860-1920 are FANTASTIC. Seriously. Arnold even includes the color and content of the fabrics used, as well as the trim(s). And she includes recommendations for undergarments, although no patterns for these :( Nonetheless, its cool, really cool, if you're into historical clothing.

In other news, I attached the sleeves on Burda 7255 today! Yeah! No too bad really, pretty basic.

marks for ease stitching

marks for sleeve dart

ease stitching

sleeve dart


sewn sleeve seam

sleeve hem, I did about 3/4inch

now its starting to look like a blouse

Next I have to sew the band around the bottom hemline. I really like the idea of the giving the bottom of the blouse some structure. After that are the buttonholes. Poo. I don't like buttonholes. 

Baring any unforeseen complications, I can definitely see myself using this pattern again. Looking at the pictures,  I think this pattern would even be good for a short jacket.

Anywhos, Happy Sewing!


Sunday, October 27, 2013

Collar Confusion and an Outfit Post

Sorry I haven't posted in a while. I've been busy preparing for our new puppy! I'm sure he'll show up in a few posts, probably sleeping while I sew. Remember how I said that I finally got the collar on Burda 7255 attached. Hahahaha. Not even close (then). I think I've finally got it on now. Suffice to say I'm not in love with Burda's instructions. 

It turns out you have to turn back the facing on both sides of the buttonhole area. The interfaced side and the non-interfaced side:
interfaced side

This is sewed onto the back interfacing of the collar. You can see that in the picture in the lower right corner. 
bigger view of the same thing

Then I had to iron the heck out of this area while trying not to wrinkle the collar. Not an easy task.

Until finally:

I'm saving the ta-da until I'm sure this actually works. I've ripped seams so much I'm crossing my fingers the interfacing on the collar holds up. I know, I know, I should make mock-ups. Maybe for Christmas I'll ask for a bolt of muslin! But seriously, this pattern makes me think I'll be making some mock-ups from now on, especially if I have to use any expensive fabrics!

To my next order of business...remember the blue taffeta skirt I posted about? I finally got to wear it! We had tickets to the symphony last night.
a bit blurry, but you get the idea
circle skirt: made by me
unseen petticoat: Modcloth
Victorian-esque blouse: H&M
not pictured patent leather pumps: JcPenneys

It was fun to wear this skirt complete with petticoat. I even curled my hair, not in any vintage style persay. We were running behind on time. Maybe it would be sort-of 40s ish if I'd combed it out.

That's all I have for now,
Wear a petticoat! Its fun!


Wednesday, October 23, 2013

Collar, More Pleats, Redoing- Burda 7255

So the instructions for the whole collar area of Burda 7255 aren't very clear. AND there aren't very many pictures on Burda patterns, big problem for me because I need the pictures. Oh how I need the pictures. I've only completed a few sections of the instructions since my last post because I've had a heck of a time figuring out how the collar on this blouse works. I even took out a collared shirt of my husbands' to get some perspective. The back facing of the collar is attached at the edges of the two front pieces of the blouse, not the shoulder seams like I thought. So I had to rip those seams and resew. Also, the collar is apparently only half the length I thought, something I think the pattern failed to specify, I'd have to check.

Anywho, I had to iron interfacing to the back facing pieces:
I think I got the piece too wet because it took a long time to dry. On the upside, the interfacing is firmly attached.
Here's me attaching the back facing to the incorret side of the front piece :p
I used a zigzag stitch on this part as well as some of the other seams of the blouse. I like to think of the zigzag stitch as the poor man's answer to a serger, it strengths the garment and helps fraying.

There were some more pleats at the bottom of the front pieces:
two little ones on each side

Not pictured is the interfacing being attached to the collar, my bad.
Here are the collar seams being sewed:
Three of the seams are nice and neat and turned inward. The last one just has to be sewed with the seams and fraying bits hanging out. Zigzag stitch it!

And finally the collar attached:
The top edge is the nasty bits edge. You can see the inverted pleat just south of the collar.

I think I'm going to like this blouse. Now am I going to like it on me? That is the question. I draped it over myself yesterday, and yep, its big. We'll see what its like the farther I get. I may need to tailor the garment a bit. 

That's all I have for today, happy sewing!


Monday, October 21, 2013

Darts and Pleats- Burda 7255

So I cut out all the pieces for Burda 7255. I decided to cut a couple sizes smaller than the Burda size chart recommends. I measured the pattern pieces, accounted for seams and pleats, and got a whopping ten inches more than the "finished" measurements said I would. I'm not surprised. I've made some non-vintage Burda things in the past and this seems to be the norm with Burda patterns. I know they say there should be "wearing ease" once the garments is made, but my idea of wearing ease isn't almost a whole foot around my mid-section thankyouverymuch. I realize that this blouse is supposed to have that 60s svelte look, but I'd be swimming in a 40+inch waist.
            -side note, I recommend always, always, measuring the patterns pieces before you cut your size. Oftentimes the suggested finished measurements do not correspond to the actual measurements you get when you measure the pieces. Make sure to account for seams, darts, pleats, etc!

After cutting out the pieces I ironed the interfacing to the left side front: (bumpy side down!)

pinned and awaiting
wet cloth application
heat + steam
=
Ta da!

Next it was time for the bust darts. Remember how in the last post I said there weren't bust darts in this blouse? My bad. There are two pretty small ones.
sewing them
inside of dart
outside of dart
Then it was time to sew the back pleat. This was my first time sewing an inverted pleat. Its not too bad; if you do it, make sure you have an iron handy, it helps, a lot! And marking, mark all pleat lines. Make sure to measure how far down the pleat lines go (or how far up). I think this one was less than 2 inches. The outside of the pleat must be able to open pretty wide.
marking the pleat(s)- there are two additional small ones on either side of the center inverted pleat
the inside, aka wrong side of the inverted pleat, sewn across the top and bottom
center = inverted, sides = additional pleats (this is the right side pictured)

Once the pleats are sewn, the neck edge should be considerably smaller around.

That's all I have for today. Up next is my non-so-favorite-part of blouses- the collar and neck band. More interfacing and ironing.


Friday, October 18, 2013

Current Project, All Caught Up!

I'm all caught up with posting past projects. My posts form now on will be about works-in-progress. I've made dresses and skirts, but never a blouse. So when I found found this burda pattern

I had to get it. And then I sat on it for about a year. I bought a couple fabrics for it, but didn't have the time to make it. Now I do, and I'm going to do it in a red cotton. I'm going to make version B; I really like that band around the bottom.

This pattern interests me because it makes me think of the mod-svelte 60s look (think Twiggy), but its also very Jackie-O.

I imagine the general shape will be like this blouse from modcloth:
1960s Fashion - Le Marais of Light Top
Or perhaps this 60s blouse at the Met:
Blouse

What is distinct to me about this kind of blouse is the lack of bust darts. I think this gives the blouse that quintessential 60s look.


Well that's all I have for now, stayed tuned!

Taffeta Circle Skirt

A while ago I promised to post about the fancier circle skirt I made. Well here it is:
I made this out of blue taffeta, not silk unfortunately, but acetate. I got the fabric on sale last Christmastime for really cheap. Its a good thing too because as I stated in my other circle skirt post, this skirt takes almost 4yds! To remind you here's the pattern I used:

7257au3
Its Butterick 7257 from 1955. Overall I really like this skirt, its light and appropriate for winter parties, concerts, the symphony, etc. But boy does it wrinkle. To take these pictures I had to do some serious ironing, and it was still wrinkled. Here's a photo with a petticoat underneath:

The actual color is between the first and third photo. The geniuses that built our apartment apparently thought a light fixture in the living room wasn't necessary.

On me with the petticoat it looks a little something like this: (the puffiness anyways)
 Maggi Stover Fashions 1957
image courtesy myvintagevogue


Monday, October 14, 2013

A Vintage Find, and an Old Bedsheet

Last year, during our beach vacation in California, I found this pattern in an antique store in Cambria:

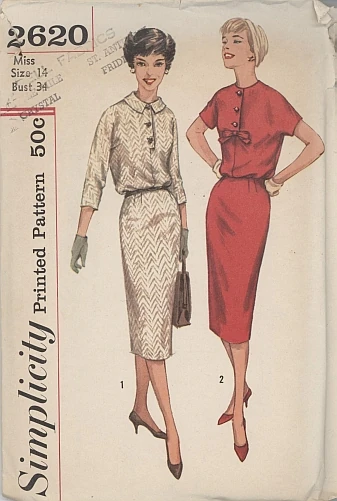
It was only $4, And all the pieces were there, And the instruction sheet! Most vintage patterns on Etsy aren't even that cheap.

It was a size 16, so a 36in bust, which is my proper size, well, except for the waist and hips. I had to "re-size" the pattern from the waist down. I used Gertie's help instructions for re-sizing vintage patterns found here: http://www.blogforbettersewing.com/2010/06/vintage-pattern-sizing.html.

So I sat on this pattern for over a year, making other things when I had the time. A month ago I decided why not? I dug through my fabric stash, not able to decide on anything, when I remembered I had kept some twin-size bed sheets, intending to use them as fabric at some point. They were my bed sheets when I was an undergrad sleeping on a small lumpy bed in a room without padding under the carpet. Ah, the good ol' days, not!

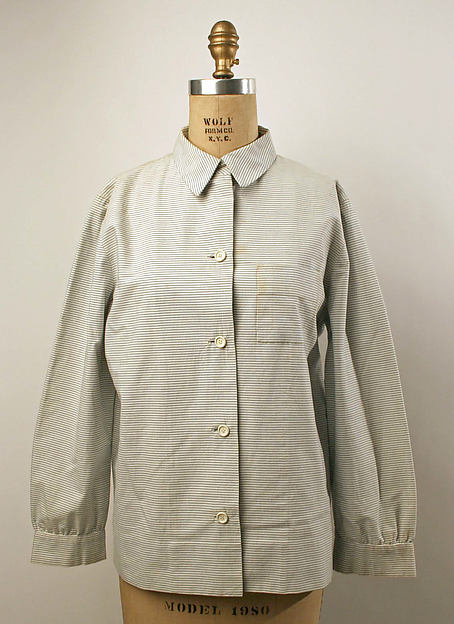
So this dress presented me with a few new challenges. First of all: the buttonhole. Oddly enough with all the things I've made I haven't had to do any buttonholes. Lots of "invisible zippers," but no buttonholes. I practiced a lot on scrap fabric before I sewed them onto the dress.

Another thing was the stiff, i.e. interfaced collar. This wasn't hard, and I must say, I like the effect. While sewing it I realized why some collars on shirts you buy are wrinkly and don't stand up: no interfacing. My husband always complains about Old Navy shirts being this way. I must say, unless they are using a really, really, thin interfacing, there isn't any in their collars.

Lastly, I learned the french tack stitch. What is that you may ask? Look on a men's tie. See the single but thick stitch on the backside of the tie where the seams meet? That's it, a french tack stitch. Super useful. I learned how to do it from FashionSewingBlogTV in this youtube video: http://www.youtube.com/watch?v=8TP8rgH37Qo
In the construction of this dress it is used to attach the lining to the dress.

All in all, I like this dress. With a belt it looks pretty good. I like it with a thicker belt than the pattern suggests though.

Here it is:

Image courtesy of wikia

Saturday, October 12, 2013

Plum 40s

About a month ago I finished Simplicity 1777:
This was my first 40s dress. I'll admit, I was a bit intimidated by all the pleating. I hadn't done any before this, but I really wanted a 40s dress with the characteristic pleating and lovely folds on the bodice front. 

I had bought some plum or eggplant purple jersey material a long time ago for this pattern. I got really busy with graduate school and had to put this project on hold. 

So, I decided to make dress A, the one without the V neckline in a different color. The skirt has two pieces, the bodice middle has interfacing and is lined. I chose contrasting black buttons for the front. I only used three, six seemed a bit much.

So the pleating isn't that bad. There are quite a few and it was tricky with the jersey material. If I made it again I might choose something different. Granted, the jersey looks fabulous, but its a pain, trust me. The other problem for me were the shoulders, I don't know why but I couldn't get them to set right. The pattern suggests shoulder pads, but I'm not a fan. I know they would really give the dress that 40s look, but shoulder pads in my mind equal 80s power suits, yuck. Also, jersey material isn't the sturdiest, so if you have to rip any seams...

Anyways, here's the finished dress:
A close up:

I wore it to the symphony, I believe with black pumps. I even bought some hot curlers to do my hair 1940sish:

Happy Sewing! (Or just drooling over patterns and photographs!)


Thursday, October 10, 2013

My Black Go-to Dress

At some point last year (can't remember when) I made Simplicity 3673:

I used a black suiting material from Joann's. I can't remember the type of fabric. I think it was polyester (isn't everything) or some kind of mystery blend. I've really gotten my mileage out of this dress. I've worn it to the symphony, nice dinners, and my MA graduation!

Here it is:
I know, I know, doesn't quite look like the picture. My middle is slightly bigger than the model's, and the shoulder straps are bunched on the hanger. (I really want a dress-form, maybe for Christmas, fingers crossed)

It wasn't the simplest, despite the Simplicity brand. There are twelve darts around the middle. Yep, I said twelve. Technically not difficult, just time consuming (and boring).

Close-up of the darts:


The bodice is lined and the sems are all turned to the inside. You have to pull the whole thing through a 3 inch opening in one of the straps. Pretty cool technique.

There is a zipper down the back with a hook and eye closure at the top. The skirt is pretty full. With a petticoat underneath it looks pretty sweet. I especially like wearing it with a green silky top that has a bow at the top, gives it a real 1930s look, oddly enough.